
Materials Needed
- -Custom Cut wood frame sections (4 mitered pieces)
- -Thumbnails (included with the frame)
- -Wood glue (avoid Gorilla Glue)
- -Soft cloth or rag
Step 1: Unpack Your Frame Components
Your kit includes four mitered frame sections and four plastic thumbnails. The thumbnail shape may vary by manufacturer.

Step 2: Apply Wood Glue to the Mitered Joints
Apply a thin drop of glue to four of the eight miter faces.
Spread it evenly, but avoid filling the slot with glue.
Do not use Gorilla Glue, as it expands and can weaken the joint.

Step 3: Join Two Frame Sections Together
Align two mitered edges and press them together to form a 90-degree corner.
Only one of the two connecting surfaces should be glued.

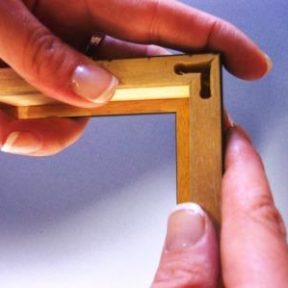
Step 4: Align the Peg Slots
Ensure the routed slots on both pieces align.
The thumbnails fit into these slots to hold the frame together.

Step 5: Insert the Thumbnails
On wider frames, there may be two slots per corner.
Lay the frame face down on a table and press the peg into the slot with your thumb.

Step 6: Ensure a Secure Fit
You may not be able to press the thumbnail fully flush with just your hands—this is normal.
Turn the frame face up, then wipe away any glue that squeezes out using a damp cloth, followed by a dry cloth.

Step 7: Fully Secure the Pegs
With the frame face up, press firmly with the heels of your hands at each corner. This will sink the thumbnails fully into place.
Again, wipe away any remaining glue.

Step 8: Step 8: Allow Time for the Glue to Dry
Let the frame sit undisturbed for at least an hour before handling.
For best results, allow the glue to cure overnight before inserting the artwork.

Final Step: Mount and Hang Your Frame
Once dry, your frame is ready to use!
Use an EZ-Finish Mounting and Hanging Kit (sold separately) to secure artwork and install hanging hardware.
Need more help? Contact info@framing4yourself.com.